Net1on1 API-Client Settings
If you have purchased the API then our developer will add the API for you. If you haven’t purchased the API yet, then please do so here or reach out to us via email.
It is important for you to understand the basics of how you can change the client settings to make your site work smoother and that your updates happen exactly
how you would like them to.
The Basics
What is an API?
API stands for Application Programming Interface and basically it allows connection and communication between two applications – in this case, your website and ours. If you would like to know more about the technicalities, we will include some links in the Helpful Resources chapter. What does the Net1on1 API client do? The Net1on1 API client can automate catalogue import, product updates, stock sync, order export and more. It’s a solution that, once set up correctly, can make running your website smoother and more convenient for you.
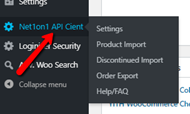
Where can you find the Net1on1 API settings?
Once it’s installed, and you are logged in to your WooCommerce admin interface, you will be able to find the Net1on1 API Client on the left-hand side among your other tabs.
Will I need advanced IT knowledge for the setup?
Not at all. Our API-client is designed to give you all the necessary tools to customise your site’s connection to Net1on1. With just a few clicks you can control what information and data flows from our site to yours and when.
Net1on1 API Connection
Customer Email ID
Add your email address, but make sure that you use the same email here that you’ve used to register your Net1on1 dropship account. The API connection will be lost if you change your email address in the client but not with Net1on1 and vice versa. The Net1on1 API Client can only be used in conjunction with a dropship account and cannot be used with a Wholesale only account.
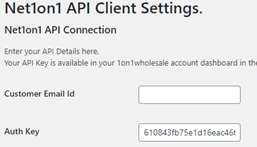
Auth Key
This is where you will need to add your authentication code that you can find from your Dashboard’s Download section (left hand side menu), just scroll down until you see your API key. This is your personalised passcode that lets your site connect to ours.
Net1on1 API Products
These settings control how Net1on1 products are added and updated in your admin system and on your site. You have a variety of options here to set up the client just how your business-needs demand it. The API is scheduled to run a product import script every 15 minutes to fetch various information about our product catalogue from our site to yours.
After installation, when this task runs for the first time, it downloads a CSV file from Net1on1 and saves it on your server in your WordPress uploads folder. The next time the script runs, 15 minutes later, it processes the next batch of lines from the file. Once it has reached the end of the saved file, it downloads a new copy of the file, and continues from the beginning with another batch and so on. Since that’s a lot of information to update all at once, you will have to determine a batch size that tells the system how many lines of information to update when the script runs. Counting with approximately 1000 product SKUs to read and update from our catalogue, and with the default batch size of 50, the script will update each product roughly every 5 hours. Depending on your hosting you may need to lower this number, or you may get to increase it, but more on this later. Here are all the settings you can access here, giving you total control of how your products and site are updated.
Enable Product Sync
This enables or disables the entire product sync system, so if you disable it then no new products will be added, and no updates will be made to the existing product database, including stock information.
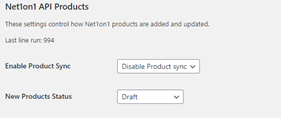
New Products Status
This is where you can decide how new SKUs are added to your site. You can decide to automatically and immediately set them live on your front end. Alternatively, you can send new products into a Draft status where you will be able to edit prices and descriptions before finalising. Or you can add them as Pending so you can review the new product before publishing manually. Products in Pending or Draft statuses are not shown on your site, so make sure you set SKUs live once you changed and edited the things you wanted.
New Categories
The API-client can automatically create product categories on your site, but if you wish to use your own category structure, this is where you can disable this feature.

Batch Size
As mentioned before, the batch size determines how many lines of information are processed each time the product importer runs. It’s very important to consider your hosting for this, because if you have a low timeout time (most shared hosting providers do) you might only able to manage 50 or so lines at a time. While, on the other hand, with some hosts you can confidently set the batch size to 2000 and let the system process the entire file during each import. Make sure you know what batch size is right for you as this is crucial for the smooth running of the importer. This may require some trial and error. If the Product Import page gives a timeout or a blank white page, you probably need to lower your batch size.
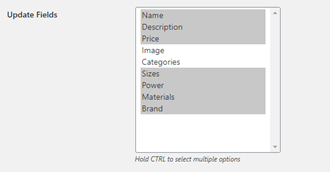
Update fields
This is where you can select what information is updated about the products that are already created and published on your site. You can deselect prices so if you have changed your prices, you won’t lose your changes every time the importer runs. Similarly, if you took the time and effort to re-write your product descriptions, you can deselect them from updating here so the importer doesn’t delete your text and replace it with our default descriptions every 15 minutes. Remember, whatever is selected here is updated and overwritten when the importer runs. New products always import with all information and do not follow this setting. We recommend using a ‘New Products Status’ of ‘Draft’
Price Import Type
The Net1on1 API-client can pull in two different prices from us, the RRP (recommended retail price) or a regular price. In this setting you can decide to ‘Ignore RRP’ which means that your catalogue will update with regular prices and you will be able to set a discounted sale price individually, as you wish. If you choose to ‘Use RRP as sale’, the regular price will import to your site as a discounted sale price and the RRP is added as a strikethrough price (eg £100 £80). There’s a downside to this though, as some WooCommerce themes will then map the entire catalogue as ‘on sale’ and add a SALE or OFFER label to almost everything. The ‘Remove all RRP/sale prices’ option cleans out the sale prices from your system including prices set by you. You can use this in case you want to reset your prices or switch from the ‘Use RRP as sale’ setting to the ‘Ignore RRP’ one. Once sale prices are removed with this option, you can switch to “Ignore RRP” and set your own sales as normal
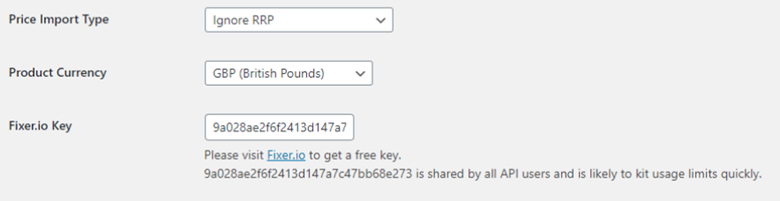
Product Currency
Choosing a non-GBP currency will automatically convert all prices on your site to the selected currency when products update next. The converter uses the rates from Google Finance.
Fixer.io Key
Currency exchange is handled by Fixer.io. The default key is used by anyone who doesn’t make their own (free) account. So we recommend you do this and enter your key here if you need to use currency exchange.
Import Brand
This setting lets you choose how the brand information is handled in relation to the products in your catalogue. The ‘tag’ option will create product tags for each brand so ‘Tenga’ becomes something you can tag products with, like you could tag ‘kegel balls’ or ‘anal toys’ as such. ‘Custom field’ will require you to edit your WooCommerce theme to display the brands, while ‘Product attribute’ adds brand information as another attribute in the product page, like size or material. Make sure to check which option will work for your site the best as this is largely dependent on what WooCommerce theme you are using. The default setting of ‘Product attribute’ is likely to be the most compatible and useful.
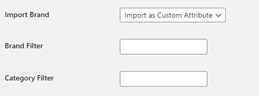
Brand Filter
If this field is empty, then all brands are imported. However, if you wish to sell only a specific selection of brands on your site, you can list them all here. Separate brand names on the list with a comma to import and update only those that are on the list.
Category Filter
If this field is empty, then all categories are imported. However, if you run a more specialised shop that focuses on male masturbators for example, then you can list those categories here. Enter a comma-separated list of categories to import only products that match.
Net1on1 API Orders
Just like with the product import, the API-client runs a scheduled task every 15 minutes to export orders from your system to ours. All orders that are in a Processing status are checked and sent to Net1on1’s system. If the client fails to export an order, the order is placed in an “On Hold” status to stop it from resending and the notes on the order will say “API Holding order due to export error. Order status changed from Processing to On Hold”. Otherwise, you will find an order export ID in the notes that is the Net1on1 order number. Once sent, orders are flagged to prevent them from resending. Orders arrive to our system in a Pending status and you will need to arrange payment for them before we can send them out. As your orders are processed by our warehouse team for shipping, your system will update with tracking numbers as appropriate and mark orders as complete.
Enable Order Export
This setting gives you the option to enable or disable the whole order export system. Use this if you don’t want to automatically send your orders to our system, but remember, you will need to place your customers’ orders manually via our website if you want them processed and sent out.
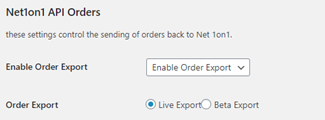
Order Export
If you are using a beta testing account to test your API setup, in the beginning you would send test orders to our testing site, beta.1on1wholesale, to make sure everything works correctly. When you are ready to set things live, this is where you will be able to switch over to live order exporting to send your orders directly to our live system for processing.
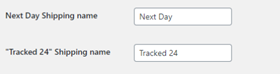
Next Day Shipping Name & Tracked 24 Shipping Name
WooCommerce lets you customize how the shipping methods that you offer to your customers appear on your website. You may call the standard method ‘bronze’, your first-class postage ‘silver’ and so on. You may call your next day shipping “Courier Next Day” or “Next Day: Courier” or any other similar name.
You can enter the name of your shipping methods to these fields, so orders placed with these two methods are marked correctly when sent to the 1on1 Wholesale system. To check what name your shop uses, place a test order with next day delivery, trigger the order export manually (by clicking on Order Export from the left-hand side menu under Net1on1 API Client) and check the XML data that is generated.
Don’t be startled by the complicated text in the XML box, you will only need to look for a line that says. <shippingname>XXXX</shippingname>. XXXX will be the name that you will need to enter in the API-client to ensure orders export correctly to our system.
Manual Triggers
There are three links where you can manually trigger the various client tasks. You can find this just under Settings within the Net1on1 API Client tab. These can help you troubleshoot issues with your catalogue or send orders through to us quicker if you don’t want to miss the 4pm cut off time for example. When you trigger either of the three processes, they create a page with a lot of technical information that can help debug any issues with the plugin. If you run into any problems or believe that the API client is not behaving as it should, please copy paste or screenshot this information and send it to us so our developer can have a look and help.
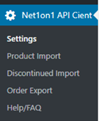
Product Import
This will manually trigger the product import according to the settings you choose.
Discontinued Import
With this link you can manually trigger the import of discontinued products so any SKU that has been discontinued by us and is out of stock are placed in a Pending status on your system. You can safely remove these products that have been moved to pending if you have no further need for them.
Order Export
This will manually trigger the task that searches for orders in a Processing status and sends them over to us in a Pending status.
Advanced
The Net1on1 API Client uses WordPress’ scheduled tasks system to trigger import and export processes, however, the WordPress system relies on traffic to your website to trigger these events. In the beginning when you are still just building up traffic to your site this can mean that the tasks are not triggered for days if no one visits your front end leading to your stock data to be out of date.
If you don’t have access to setup server cron tasks, or just want a simpler method, we’ve enabled some direct URLs you can use to access the tasks and use in a service such as setcronjob.com or similar. These links can trigger the tasks just like visitors to your site would, so it’s worth using these in the beginning just to make sure your site is always up to date. Make sure to insert your actual domain into the links below instead of “yourdomain.com”.
Import Products:
http://yourdomain.com/wpcontent/plugins/Net1on1_API/cron_product_import.php
Export Orders:
http://yourdomain.com/wpcontent/plugins/Net1on1_API/cron_order_import.php
Discontinued Products:
http://yourdomain.com/wpcontent/plugins/Net1on1_API/cron_discon_import.php
Summary
There will be some default settings already in your API and initially you probably won’t have to touch these, however, as you run your site, update descriptions, set up sales and so on, you will need to be able to exempt these from regular updates. Being able to navigate in the API-client settings will also allow you to quickly determine problems with the importer and ask for help with concrete, sufficient information.
All of this might be more technical than what you want to engage with, but with this guide and the user-friendly interface, you should be able to deal with the basics and use the API-client easily. We tried making this API-client explanation as comprehensive as possible, but if you have any questions about it, please do not hesitate to get in touch, our developer will be happy to help.
API Resources
What’s an API? – Full Explanation: https://www.mulesoft.com/resources/api/what-is-an-api
Setting Up Cron Jobs (Tom McFarlin article): https://tommcfarlin.com/wordpress-cron-jobs/